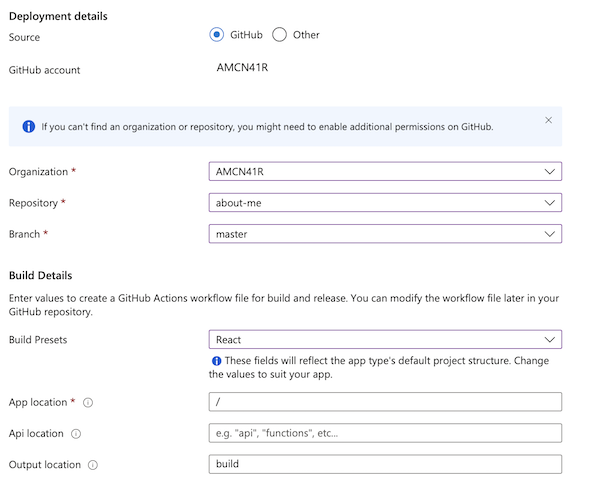
Why are you not using Azure Static Web Apps?!

So, I came across this blog the other day…

Host Static Web Sites for Free in Azure

Have a simple site that’s just html, css, javascript and other static content? You can host it for free in Azure. Not only is it free to host it is much easier to maintain than most off the self content management systems.

This sparked my interest, but then the kicker…

What about SSL? As soon as you add a custom domain SWA will automatically get an SSL cert that matches your domain. It will renew as needed- you need to do nothing else!

Wait, what?

I have a personal website that is a static site built with react (using create-react-app). Its stored on github, no actions or any other CI/CD scripts. At the moment, I pay for hosting and have yet to sort an SSL certificate so I thought I’d check it out.

Wow!

I was not prepared for how quick and easy it was! I mean, it took me literally 5 minutes.

  1. Sign into the Azure portal
  2. Go to Static Web Apps
  3. Click Create
  1. Select a subscription, resource group and name for your static web app
  2. Select the free tier and most appropriate region
  3. Select Github and sign in
  4. Select your repo and branch
  5. Select your build details
  1. Create it.
  2. And that’s basically it!

As part of the creation process, it

  • automatically created a github workflow that builds and deploys my app, including push and PR triggers
  • committed this to the repo
  • generated a custom hostname and SSL certificate
  • deployed and hosted my app

It’s just so simple

I followed a few extra steps to set up my custom domain, and now have my personal site hosted for free on azure!

Further reading

There are other ways to do this (via VS Code for example), and other basic templates for different frameworks and static site generators. The docs are really helpful…

Azure Static Web Apps
Azure Static Web Apps Docs
Create via the Portal
Configure Custom Domains

Unit Testing C# Controllers

I’m a huge proponent of automated testing in all forms. There is always a balance to find between the effort required to write a test case vs the benefit of that test case, but with some help, you can reduce that effort.

Contract Testing

First, I’d like to (briefly) talk about contract testing.

Contract testing is defined nicely in this blog by the guys at Pact Flow.

Contract testing is a methodology for ensuring that two separate systems (such as two microservices) are compatible with one other. It captures the interactions that are exchanged between each service, storing them in a contract, which can then be used to verify that both parties adhere to it.

In my humble opinion, this is great strategy to employ when working on any large scale application or solution. Contract testing can give us confidence that our APIs do not break any upstream integrations or clients. As a result, we can move faster and deliver value more quickly and safely.

A quick win?

If true contract testing seems a bit far off right now, an interim step might be to write unit tests against your controller methods. With the help of reflection, we can test things like the route and method attributes as well as the implementation.

For example, this static method can be used to check that a controller method has the expected HttpMethodAttribute with the correct route template:

1
2
3
4
5
6
7
8
9
10
11
12
13
14
15
16
17
18
19
20
public static void MethodHasVerb<TController, TVerbAttribute>(string methodName, string template)
where TController : ControllerBase
where TVerbAttribute : HttpMethodAttribute
{
var method = typeof(TController).GetMethod(methodName);

var attr = method?.GetCustomAttributes(typeof(TVerbAttribute), false).ToList();

if (attr == null)
{
throw new Exception("No attributes found.");
}

// this methods checks that the required attribute is present only once
attr.AssertAttributeCount<TVerbAttribute>();

var verb = (HttpMethodAttribute) attr[0];

Assert.Equal(template, verb.Template);
}

Assuming that the method above is a member of the class AssertController, it can be used like this…

1
2
3
4
5
6
7
8
9
10
11
12
13
14
15
16
17
// method under test in OrderController
[HttpGet("{orderId}/products")]
public async Task<IActionResult> GetProductsForOrder(Guid orderId)
{
// implementation
}

// unit test (using XUnit)
[Fact]
public void GetProductsForOrder_Method_HasCorrectVerbAttributeAndPath()
{
AssertController
.MethodHasVerb<OrderController, HttpGetAttribute>(
nameof(OrderController.GetProductsForOrder),
"{orderId}/products"
);
}

How easy is that?!

With very little effort, we have an automated test that ensures that our original contract of Verb and Route does not change.

Going a little further…

With a couple of extra helper methods, you can apply the same approach for methods without a route template, and to the controller itself…

1
2
3
4
5
6
7
8
9
10
11
12
13
14
15
16
17
18
19
20
public static void MethodHasVerb<TController, TVerbAttribute>(string methodName)
where TController : ControllerBase
where TVerbAttribute : HttpMethodAttribute
{
var method = typeof(TController).GetMethod(methodName);

var attr = method?.GetCustomAttributes(typeof(TVerbAttribute), false).ToList();

attr.AssertAttributeCount<TVerbAttribute>();
}

public static void HasRouteAttribute<TController>(string route)
where TController : ControllerBase
{
var attr = typeof(TController).GetCustomAttributes(typeof(RouteAttribute), false).ToList();

attr.AssertAttributeCount<RouteAttribute>();

Xunit.Assert.Equal(route.ToLower(), ((RouteAttribute)attr[0]).Template.ToLower());
}

I’ve created a gist on GitHub with these methods and some examples.

Tests Passed

Some might think this approach a little overboard, but I think for relatively little effort, you can get some peace of mind that the api you designed is still in place as your application grows.

Of course, this does not guarantee the implementation doesn’t change, but that’s a topic for another day 😃

ASP.NET Core 3 & Newtonsoft.Json

.NET Core 3 is here and that means upgrade time!

It’s great news that Microsoft have added the System.Text.Json namespace so that we no longer have to reach for Newtonsoft.Json as the first thing we do after File > New Project.

However, if you don’t feel ready, or there are few quirks and edge cases that you find when upgrading, you can configure your application to use Newtonsoft.Json instead!

Using Newtonsoft.Json

It’s really easy to set up. Simply, adding a package reference and then adding it to the service collection in your Startup.cs file…

Packagage Reference

1
<PackageReference Include="Microsoft.AspNetCore.Mvc.NewtonsoftJson" Version="3.1.1" />

Startup.cs

1
2
3
4
5
6
7
8
9
10
11
12
13
14
15
16
17
18
public void ConfigureServices(IServiceCollection services)
{
services
.AddMvc()
.AddNewtonsoftJson();

// OR

services
.AddControllers()
.AddNewtonsoftJson();

// OR

services
.AddControllersWithViews()
.AddNewtonsoftJson();
}

You can also configure the serialization options…

1
2
3
4
5
6
7
8
9
10
11
12
13
public void ConfigureServices(IServiceCollection services)
{
services
.AddControllers()
.AddNewtonsoftJson(opts =>
{
opts.SerializerSettings.ContractResolver =
new Newtonsoft.Json.Serialization.CamelCasePropertyNamesContractResolver();

opts.SerializerSettings.Converters.Add(
new Newtonsoft.Json.Converters.StringEnumConverter());
});
}

Conclusion

That’s it! It’s really that simple.

If you’re wanting to upgrade your existing applications, but are unsure of the side affects or edge cases of using the new System.Text.Json namespace, you can really easily configure your application to use the perhaps more familiar Newtonsoft.Json library.

Making things easier with a PowerShell profile

PowerShell is my go-to terminal. I use it a lot, mainly for git commands, but for things like mongo, js tooling (gulp etc), the dotnet cli, among others.

Like similar tools, PowerShell allows you to create a custom profile that gets loaded each time you start a new session. This profile can be utilised for creating shortcuts, aliases and functions that make everyday tasks and commands quicker and easier.

By default, each time PowerShell is launched, it will try and load a .ps1 file called Microsoft.PowerShell_profile.ps1 from %USERDIR%\Documents\WindowsPowerShell\.
You can see the expected profile path by typing $PROFILE

PowerShell profile location

Unfortunately, this file does not exist by default, so you will have to create it. The easiest way to do that is…

…create the directory if it does not exist:

1
mkdir $env:USERPROFILE\Documents\WindowsPowerShell

…and then create your profile with:

1
New-Item $PROFILE

Once the file has been created, you can open it for editing…

1
ii $PROFILE

ii is an alias for the PowerShell command Invoke-Item.

Aliases

Create aliases to commonly used commands or programs using the Set-Alias command. For example, create an alias to launch notepad from the terminal by typing np

1
Set-Alias np notepad.exe

Functions

Alternatively, you can create a function to encapsulate more behaviour.

This example creates a shortcut for listing globally installed npm packages…

1
function npmGlobals(){ npm ls -g --depth=0 }

function example: npmGlobals

Some simple git examples

As I said before, I primarily use PowerShell for running git commands, so I’ve created some shortcuts for the git commands I use often:

Shortcut Command Function
gs git status function GS() { git status }
gf git fetch –prune function GF() { git fetch –prune }
gc git commit -m function GC() { git commit -m $args[0] }

Modifying the prompt

The default PowerShell prompt looks like this…

the default prompt

You can override this by including a Prompt function in your profile…

1
2
3
4
5
6
7
function Prompt {
Write-Host ""
Write-Host ("$ ") -NoNewline -ForegroundColor Gray
Write-Host ($(Get-Location)) -NoNewline -ForegroundColor Yellow
Write-Host (">") -NoNewline -ForegroundColor Gray
return " "
}

prompt example

Sharing your profile across multiple machines

I’m sure there are many ways to do this, but the way that works for me is using OneDrive. I have my personal profile stored in my OneDrive so that it is synced to each computer that I use. Then I just create the file explained in the steps above and simply ‘dot-source’ my actual profile…

My Microsoft.PowerShell_profile.ps1

1
. 'C:\Users\Alex McNair\OneDrive\PowershellProfile.ps1'

My Profile

You can check out my current profile on GitHub.

Further reading

These are just a few examples that I use to make daily tasks a bit easier. There are plenty of helpful blogs and resources online, including the following to articles:

Understanding the Six PowerShell Profiles
Persistent PowerShell: The PowerShell Profile

Introducing Harness, an integration test harness for MongoDb

What is Harness?

Harness is a free and open source .NET library designed to manage the state of a Mongo database during testing.

At its core, it endeavours to aid unit and integration testing by putting one or more Mongo databases in a known state at the beginning of a test, or suite of tests. The framework allows you to control your code’s dependency on a Mongo database, therefore increasing test consistency and repeat-ability.

Why do I need this?

If you want to perform integration tests on your Mongo repositories, it would be really helpful to have a known set of data in your target database so that you can write accurate and consistent tests. Harness allows you to do exactly that!

How do I get it?

The easiest way to include it in a project is via nuget, and can be installed with…

1
Install-Package Harness

What’s the simplest way to get it working?

Do you like config files or fluent configuration in code? Either way, Harness has you covered. You can find examples of both here, or see below for a simple config file example…

Once you have added Harness to you project, one way to get up and running is with 2 simple json files…

Settings File

The settings file must have a .json extension. It is a json object that contains a databases property that is an array of database objects.

Example settings file, ‘ExampleSettings.json’
1
2
3
4
5
6
7
8
9
10
11
12
13
14
15
16
17
18
19
20
21
22
{
"databases": [
{
"databaseName": "TestDb1",
"connectionString": "mongodb://localhost:27017",
"collectionNameSuffix": "",
"dropFirst": true,
"collections": [
{
"collectionName": "TestCollection1",
"dataFileLocation": "Collection1.json", // this is the path to a data file described below
"dropFirst": false
},
{
"collectionName": "TestCollection2",
"dataFileLocation": "Collection2.json",
"dropFirst": false
}
]
}
]
}

Data File

Test data files must have a .json extension and contain an array of json objects.

Example data file, ‘Collection1.json’
1
2
3
4
5
6
7
8
9
10
11
12
[
{
"_id": { "$oid": "56a69c36d1894801d0ce3d05" },
"Col1b": "Value1b",
"Col2b": "Value2b"
},
{
"_id": { "$oid": "56a69c36d1894801d0ce3d06" },
"Col1b": "Value3b",
"Col2b": "Value4b"
}
]

Once you have created the settings and data files, all you need to do is make your class of tests extend HarnessBase, and give it the [HarnessConfig] attribute with the path to your settings file…

1
2
3
4
5
6
7
using Harness;

[HarnessConfig(ConfigFilePath = "path/to/settings.json")]
public class MyMongoIntegrationTests : HarnessBase {
// tests go here
...
}

Are there more examples?

You can check out examples of how to get started with both the config files and fluent configuration, as well as several XUnit examples on the Harness GitHub page.

Contributing

If you find any issues, or have any suggestions, feel free to log an issue or create a pull request.

License

MIT License

But I just need the salt?!

I recently came across this xkcd comic and absolutely loved it. It made me laugh because I could see myself, and so many others, in it.

the general problem

It’s funny because it’s true, and it got me thinking… this is something I’ve seen, not only during development, but through all stages of a project. It can be trivial, but it can also be something that slows a project, or even halts it completely.

The first thing that springs to mind, that I’ve seen and been guilty of many times, is something like the following example…

Supreme Leader General Base Class

‘Yo! We need to write something to validate that a product has a price. That should be pretty easy right?’
‘Yeah, but we should make it validate other values too, in case we need that later on.’
‘Oh yeah, and not just products either.’
‘Of course! We’ll definitely need to validate all the other things we haven’t written yet.’
‘It’ll save time in the long run!’

Will it?

Before you know it, you have some GenericValidatorRepositoryBaseFactoryResolver<T> and loads of supporting classes and interfaces, when all you probably needed was one simple function.

It’s an exaggeration to make the point, and I’m not saying that abstraction is a bad thing, far from it! But I think it is really important to find a balance that keeps emphasis on the needs of the customer.

For instance, in our example, it might be that we never end up needing to validate any other type of object. We have delivered the requirement, but at what cost? Costs we might not necessarily think about. It probably took longer than the simple implementation, there will be an extra maintenance overhead due to the more complex code, and increased number of tests that now have to be kept up to date etc.

As a good friend once told me, ‘It may be the nicest code you’ve ever seen, but if it never gets shipped it’s useless!’

Of course, this isn’t an excuse to hack out any old code as quickly as possible. We still have responsibilities as developers to adhere to good coding practices, otherwise we end up going too far the other way, and actually getting slower in the long run.

The challenge is working out how to meet and deliver the requirement as efficiently as you can, but in a way that can easily be extended in the future - to borrow from Extreme Programming…

‘Do the simplest thing that could possibly work.’

On a side note, there is a really great video from MPJ on his channel funfunfunction about the growth stages of a programmer that is relevant here, and well worth a watch!

Minimum Viable Product

Or, in other words…

Deliver value quickly!

Techopedia explains a minimum viable product (MVP) as…

… the most pared down version of a product that can still be released. An MVP has three key characteristics:

  • It has enough value that people are willing to use it or buy it initially
  • It demonstrates enough future benefit to retain early adopters
  • It provides a feedback loop to guide future development

The idea with creating an MVP is not only to speed up the learning process, but to also put emphasis on the needs of the customer.

As I said, we don’t just see this issue in development, and can apply the same thinking to requirements gathering and design. It’s so easy to get carried away when designing new features, and sometimes lose sight of the actual requirement and immediate customer need.

Extending the original example…
‘We need a new feature to dispense salt…’
‘Ok, no problem, that shouldn’t take too long. But what if it did all condiments?’
‘Yeah, great idea, but what about people with allergies?’
‘Ooh good one! Let’s make sure it can do track allergy information. Don’t worry, it’ll save time in the long run!’

Now your poor client, whose immediate need is just to be able to dispense salt, has to wait months instead of weeks for something they might never need - or want!

So, what do we do about it?

This is something that can so easily crop up in many parts of a project’s lifecycle, and there is not a simple ‘just do this’ solution. However, I think this is a very important and apt analogy to have in our minds every time we start something new.

As a software developer, or member of a project team, your goal should be to deliver value throughout the process. Start small and build iteratively!

So, every time we sit down to write a piece of code, or design a new feature or a new set of requirements, simply ask yourself…

Do they just need the salt?

Setting up Karma with Aurelia, Typescript & SystemJS

I’m relatively new to setting up unit testing for a javascript project, so when I set out to start adding it to an existing project I obviously turned straight to google.

After a bit of searching I settled on using Karma, Mocha and Chai.

As you’d expect, I found loads of information about unit testing javascript and typescript, and how to use mocha and karma etc, but struggled to get it to work with my project configuration.

I was using a combination of Karma, Mocha and Chai, Typescript, SystemJS and Aurelia, and I struggled to find much information about this specific setup.

I persevered and finally managed to get it to work, so wanted to write down what I did for anyone else who finds themselves in the same boat.

Aurelia Skeleton Project

I’m starting with a basic Aurelia project (using Typescript and SystemJS) that I created quite quickly from scratch. You can see how I did that here… Creating an Aurelia app from scratch using typescript & jspm.

Or, you can grab the source code from here.

Setting up

Dependencies

First, we install the test libraries we want to use using npm, saving them as development dependencies…

1
npm install --save-dev karma mocha chai

some useful karma plugins…

1
npm install -- save-dev karma-systemjs karma-mocha karma-chai karma-phantomjs-launcher karma-mocha-reporter

the relevant type definitions…

1
npm install --save-dev @types/karma @types/mocha @types/chai

and install chai with jspm as a development dependency (to make it easier for SystemJS to load it when running the tests)…

1
jspm install --dev chai

Karma Configuration

Next, create a new karma config file by running karma init.

Use the default settings EXCEPT the following…

Which testing framework do you want to use ? - Mocha
Do you want to capture any browsers automatically ? - PhantomJS

Now that we have a karma.conf.js in the project root, we need to add configuration for SystemJS, and tweak a couple of other options.

Open the karma.conf.js file and update the following…

  • Add ‘systemjs’ as the first item in the frameworks array…
    1
    frameworks: ['systemjs', 'mocha' ]
  • Set the files array to the following…
    1
    2
    3
    4
    5
    files: [
    'test/setup.ts',
    { 'pattern': 'test/*.ts' },
    { 'pattern': 'test/**/*.ts' }
    ],
  • Change the reporter to use he mocha reporter…
    1
    reporters: ['mocha'],
  • Add the following SystemJS configuration…
    1
    2
    3
    4
    5
    6
    7
    8
    9
    10
    11
    12
    13
    14
    15
    16
    17
    18
    19
    20
    21
    22
    23
    24
    25
    26
    27
    systemjs: {
    configFile: 'config.js',
    config: {
    paths: {
    '*': '*',
    'src/*': 'src/*',
    'typescript': 'node_modules/typescript/lib/typescript.js',
    'systemjs': 'node_modules/systemjs/dist/system.js',
    'system-polyfills': 'node_modules/systemjs/dist/system-polyfills.js',
    'es6-module-loader': 'node_modules/es6-module-loader/dist/es6-module-loader.js'
    },
    packages: {
    'test': {
    defaultExtension: 'ts'
    },
    'src': {
    defaultExtension: 'ts'
    }
    },
    transpiler: 'typescript',
    },
    serveFiles: [
    'src/**/*.*',
    'jspm_packages/**/*.js',
    'jspm_packages/**/*.json'
    ]
    },

calc.ts

Let’s add a simple class that we can write tests for.

Create calc.ts in the src folder and add the following…

1
2
3
4
5
export class Calc {
add(a: number, b: number){
return a + b;
}
}

Writing Some Tests

We will add all our test files inside a folder called ‘test’, so create this folder in the project root.

setup.ts

Add a file inside the ‘test’ folder called setup.ts.

The setup.ts file is used to load the aurelia polyfills and browser abstraction layer for our tests…

1
2
3
import "aurelia-polyfills";
import {initialize} from "aurelia-pal-browser";
initialize();

calc.spec.ts

Now we can write a simple test for the calculator class.

Add a file called calc.spec.ts into the ‘test’ folder and add the following code…

1
2
3
4
5
6
7
8
9
10
11
12
13
14
15
16
17
18
19
20
21
22
23
24
25
26
27
import {expect} from "chai";
import {Calc} from "../src/calc";

describe("Calc tests", () => {
describe("Add", () => {
it("passing 2 positive numbers returns the expected result", () => {
// arrange
const sut = new Calc();

// act
const result = sut.add(2,5);

// assert
expect(result).to.equal(7);
});
it("passing 2 negative numbers returns the expected result", () => {
// arrange
const sut = new Calc();

// act
const result = sut.add(-2,-5);

// assert
expect(result).to.equal(-7);
});
});
});

Testing, testing

All that’s left to do is run the tests.

You can do this from the command line with…

1
karma start

karma test results

And that’s it!

You can find the finished source code here.

Creating an Aurelia app from scratch using typescript & jspm

There are a number of ways to create a new Aurelia app (the CLI, the skeleton projects etc), and plenty of demos on how to do it. Having been through this process, I was keen to create my own skeleton application, specifically using typescript and jspm/systemjs, to help embed the things I’d learned. Here’s what I did…

Prerequisites

Before getting started, make sure you have node and npm installed, and the following packages installed globally…

1
2
3
npm install -g typescript
npm install -g jspm
npm install -g gulp-cli

I also use lite-server to host apps for testing, you can install that globally too…

1
npm install -g lite-server

Starting with an empty folder…

We are going to use npm to manage development dependencies, and jspm to manage the the libraries our finished app will use.

npm

Create a new npm project with the following command and accept the default settings…

1
npm init

Then we install our development dependencies…

1
npm install --save-dev typescript jspm lite-server gulp gulp-typescript @types/es6-shim

jspm

After that, create a new jspm project with…

1
jspm init

Accept all the defaults EXCEPT for Which ES6 transpiler would you like to use, Babel, TypeScript or Traceur? - make sure to choose TypeScript.

Then we can install the libraries we want to use to build our app…

1
jspm install aurelia-framework aurelia-bootstrapper aurelia-pal-browser aurelia-polyfills

aurelia typings

At the time of writing (to the best of my knowledge), there is an issue with the typescript typings resolution for libraries that provide their own types (rather than through npm install @types/..) that you install via jspm. Aurelia is one such library - the typescript compiler cannot find the Aurelia type definitions if you install aurelia with jspm.
This stack overfow question has some more information.

To get round this, we can also install the aurelia libraries as development dependencies with npm…

1
npm install --save-dev aurelia-framework aurelia-bootstrapper aurelia-pal-browser aurelia-polyfills

Note: This is only so that the typescript compiler can find the aurelia type definitions, and won’t actually be used from the node_modules folder.

We’ve now got everything we need to build our app. We should have a config.js file and jspm_packages alongside our package.json and node_modules folder…

setup complete

Creating the app…

All of the code we write, will go into a folder caled src. We are going to create a class to bootstrap aurelia is the standard way, and a simple page to illustrate data binding.

Create the src folder in the project root directory, and create 3 new files within it..

  • main.ts
  • app.ts
  • app.html

creating source files

main.ts

1
2
3
4
5
6
7
8
9
10
11
import { Aurelia } from "aurelia-framework";

export function configure(aurelia: Aurelia) {

aurelia
.use
.standardConfiguration()
.developmentLogging();

aurelia.start().then(a => a.setRoot());
}

app.ts

1
2
3
4
5
6
7
8
export class App {
constructor() {
this.welcomeMessage = "Welcome to our Aurelia application";
}

private welcomeMessage: string;
private inputText: string;
}

app.html

1
2
3
4
5
6
7
8
9
10
11
12
13
<template>

<h2>${welcomeMessage}</h2>

<div>
<input type="text" value.bind="inputText">
</div>

<div>
${inputText}
</div>

</template>

Building the output…

We will serve files from a directory called dist. This folder will contain the result of building the code we have written in the src folder. To do this, we wil use gulp.

tsconfig.json

The first thing we need to do is turn the typescript files we have written into javascript files. We use the typescript compiler to do this, with some options specific to our project - these options go into a file called tsconfig.json.

Create the tsconfig.json file in the project root and add the following…

1
2
3
4
5
6
7
8
9
10
11
12
13
14
{
"compilerOptions": {
"module": "amd",
"moduleResolution": "node",
"experimentalDecorators": true,
"emitDecoratorMetadata": true,
"sourceMap": true,
"target": "es5",
"outDir": "dist/"
},
"include": [
"./src/**/*.ts"
]
}

update config.js

We can also update the config.js file to tell systemjs to always start in the dist/ folder when looking for the modules we’ve written…

1
2
3
4
5
6
7
8
9
10
11
System.config({
baseURL: "/",
defaultJSExtensions: true,
transpiler: "typescript",
paths: {
"*": "dist/*", // <------------------------ ADD THIS LINE
"github:*": "jspm_packages/github/*",
"npm:*": "jspm_packages/npm/*"
},
map: {
// rest of file

gulp

Add a new file, gulpfile.js, in the project root and add the following…

1
2
3
4
5
6
7
8
9
10
11
12
13
14
15
16
17
18
19
20
const gulp = require("gulp");
const ts = require("gulp-typescript");

const tsProject = ts.createProject("tsconfig.json");

gulp.task("build:ts", () => {
tsProject
.src()
.pipe(tsProject())
.pipe(gulp.dest("dist/"));
});

gulp.task("build:html", () => {
gulp
.src("src/**/*.html")
.pipe(gulp.dest("dist/"));
});

gulp.task("build", ["build:ts", "build:html"]);

Now, from the command line, run gulp build - this will create the dist/ folder with our html templates and transpiled typescript files…

the build output

Serving up…

All that’s left is to create the index.html then serve what we’ve done locally using lite-server.

index.html

Create the following index.html in the project root…

1
2
3
4
5
6
7
8
9
10
11
12
13
14
15
16
17
18
19
<!DOCTYPE html>
<html lang="en">

<head>
<meta charset="UTF-8">
<title>Aurelia App</title>

<script src="jspm_packages/system.js"></script>
<script src="config.js"></script>
<script>
System.import("aurelia-bootstrapper");
</script>
</head>

<body aurelia-app="main">

</body>

</html>

lite-server configuration

Create a file caled bs-config.json in the project root with the following options…

1
2
3
4
5
6
7
8
9
10
11
{
"port": 3000,
"files": ["./**/*.{html,htm,css,js}"],
"server": {
"baseDir": "./"
},
"exclude":[
"node_modules/",
"jspm_packages/"
]
}

Run it…

Then start the application by running the following command…

1
lite-server

And the crowd goes wild!

That’s it! We made a basic aurelia app using jspm and systemjs, written in typescript.

You can find he source code here.